These fun egg-speriments illustrate science principles in a meaningful way. Make a rubbery, naked egg; make your own natural egg dye, and more! There is even a bonus project about baby chicks. That makes six egg-citing science projects to try!

Disappearing Eggshell
An egg is covered by a hard shell to help protect the chick growing inside. When the chick is ready to hatch, it breaks the shell open. Try this experiment to find out what a shell is made of:
What You Need:
- An egg from the grocery store
- A drinking glass
- White vinegar
What You Do:
1. Set a raw egg in a glass of white vinegar so that it’s completely covered in the liquid. Bubbles should start to form on the surface of the egg.
2. Let the egg sit in the vinegar for about 3 days and then take it out and rinse it in water, being careful not to pop it. Does it feel different from when you put it in the vinegar? Does it still have a white shell?
What Happened:
 The eggshell disappeared! But there might be some chalky white stuff left on the egg. This is because vinegar is a type of acid that ‘ate’ away and dissolved the calcium carbonate that the shell is made out of. (Chalk is also made out of calcium carbonate!) When something dissolves, it breaks into very tiny pieces and mixes with a liquid. You can see it happening if you put a sugar cube into a cup of hot water and stir. The sugar cube disappears as the sugar dissolves into the water.
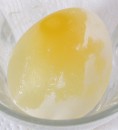
You might be wondering why the egg white and yolk inside the shell stayed in the shape of an egg even though the shell is gone. This is because the egg has another covering underneath the shell; called a membrane. It is very thin and you can see the yellow yolk through it. The vinegar can’t dissolve the egg membrane, but some of it was able to get through the membrane, making the egg swell up.
Shrunken Egg
In the last project, the egg membrane let liquid in, making the egg swell a little bit. Do this project to see if you can get the egg to shrink!
What You Need:
- The egg without its shell from the previous project
- A drinking glass
- Corn syrup
What You Do:
1. Carefully place the egg in a glass of corn syrup, so the egg is covered.
2. Let the egg sit in the corn syrup for about 3 days. Then take it out and see what happened!
What Happened:
The egg shrank! This is because the egg membrane let a bunch of water pass out of the egg to try to balance how much water was inside the egg and how much water was outside it in the glass. The very tiny parts that make up corn syrup (called molecules) were still too big to pass through the membrane, so none of the corn syrup got inside the egg. The egg lost a lot of water, but didn’t get anything to take the water’s place, so it looks a little funny! Do you think it would fill up again if you put it in a glass of water? Try it out!
The fact that the egg membrane can let some things through is very important for a baby chick. Air passes through the membrane, just like water did in this experiment, and that allows the baby chick to breathe while it’s inside the egg.
Natural Egg Dye
This spring try coloring Easter eggs using natural dyes made from edible ingredients. You can make blue, orange, red, yellow, purple, green, and pink—all with ingredients like onions and cabbage! Get an adult to help you. You’ll also need several hours to complete the project. Some eggs will need to sit in the dye overnight in the refrigerator to get the deepest colors.

What You Need:
- Several cooking pots (medium to large)
- Distilled white vinegar
- Eggs (1 dozen)
- Bowls or mugs
- Egg carton or wire rack (for drying eggs)
- Printable worksheet (optional)
What You Do:

Have an adult hard-boil the eggs for you. Bring water to a boil, add eggs, then continue to boil for about 10 minutes. Remove the eggs from the heat, and rinse them in cold water. Once you have cooked your eggs, you can dye them nearly any color you want! After you pull each egg out of the dye set it in an empty egg carton or on a wire rack to dry. Once each egg is completely dry, gently rub it with a little bit of oil (vegetable or safflower oil works well) on a towel to make it extra shiny!
Purple eggs: Thaw a container of concord grape juice concentrate. Pour enough concentrate to cover an egg completely into a bowl or mug. Add 1 tablespoon of vinegar. Put your hard-boiled egg in, checking it every few minutes until it reaches the desired color.
Blue eggs: Have an adult slice one whole head of red cabbage and add it to a pot of boiling water. Cook the cabbage in boiling water for 20-30 minutes, until the water turns bright blue. To make marbled eggs, put some of the cooked cabbage in a bowl and add 1 tablespoon of vinegar. Stir the cabbage and vinegar, then add the egg and wrap it in the cooked cabbage. Leave it for several hours, or even overnight! To make solid blue eggs, pour some of the blue cooking liquid into a mug or bowl, add 1 tablespoon of vinegar (the liquid will change colors when you do this), and add an egg. You will need to leave the egg in for several hours to make a pastel blue egg, or for 24 hours to make a deep blue egg.

Green eggs: You will need 1 cup of fresh or frozen spinach, vinegar, and a medium-small cooking pot. Have an adult add the spinach to a pot of boiling water and cook for half an hour, until the water is yellow-green. Pour some of the colored liquid into a bowl, and add 1 tablespoon of vinegar to make dye. If you leave the egg in for several hours, this will make a pale green color. To make a darker green, mix 1 tablespoon of vinegar with some of the cooked spinach in a bowl. Wrap the spinach around an egg, and leave for several hours.
Yellow Eggs: Fill a mug with enough water to completely cover an egg. Add 1 tablespoon of vinegar, and 1 tablespoon of turmeric powder. Add an egg, and leave it for about one hour to turn it bright yellow! You could also try using blue dye (from red cabbage) with turmeric powder added to make a greenish-yellow egg.
Orange and red eggs: Add the skins (just the papery top layers) of 3-4 yellow onions to a pot of boiling water, and cook for 30 minutes. Drain the liquid into a bowl and add 1-2 tablespoons of vinegar. For orange eggs let them sit in the dye for up to 3 hours. For red eggs, let them sit in the dye all day, or even overnight!
Pink eggs: You can make a vivid pink dye by using beets. Boil sliced beets (fresh or frozen) in a pot of water for about 30 minutes, or until the water is bright pink. Pour some of the pink water into a mug, add 1 tablespoon of vinegar, and dip your eggs into the dye, leaving them for up to an hour.
Try some of these ideas to make your natural dyes egg-stra special:
- Use a white crayon or wax candle to scribble or draw all over an egg before you dye it.
- Put stickers (stars, hearts, flowers) on the surface of your egg. Once the dye has dried, remove the stickers to show the plain white egg shell.
- Have an adult help you drip rubber cement over an egg to make a swirled pattern. Once the rubber cement dries, dye the egg, let it dry and carefully peel off the rubber cement.
Keep experimenting! You can try boiling your eggs at the same time as you are cooking the vegetables or fruit. Use pomegranate juice instead of water for pinkish-brown eggs. Use apple peels for yellow or green eggs. Use blueberries for blue eggs. What else can you think of to use as a natural dye? Try it out!

What Happened:
Have you ever eaten fresh berries and stained your fingers? The pigments that give vegetables and fruits their color can be used to make dye! When the vegetable is boiled, the pigments escape into the water and make a kind of dye. Vinegar is a natural preservative. Adding vinegar to the dye helps the color stay looking bright.
Why does red cabbage dye eggs blue? Even though the cabbage looks purple, the pigments that came out into the water were blue. Red cabbage contains a pigment called anthocyanin. Anthocyanin actually changes color when you mix it with a strong acid (such as vinegar), which is why the dye looked reddish before you put the egg in. It still dyed eggs blue, because the shell does not have any strong acid in it.
What makes some eggs light colored and some dark colored depends on two things: how strong the dye is, and how long you leave the egg in the dye. We use the word concentration when talking about how strong liquid is. Strong tea is very concentrated, while weak tea is diluted (or made weaker by adding liquid). If you make two cups of tea, one weak and one strong, they both have the same amount of water, but they have different amounts of flavor. For natural Easter egg dyes, we’re talking about the concentration of color – is it strong or weak? A dye that looks light-colored will make a light-colored egg, no matter how long you leave it in the dye. The onion skin dye can make either orange or red eggs. When you leave the egg in for a short time, it comes out looking orange. That is because the pigments from the dye have started to stick to the egg, but not completely. When the egg is covered in many pigments, it turns red.
Spin the Eggs
What You Need:
- 1 hard boiled egg
- 1 raw egg
What You Do:
1. Spin the hard-boiled egg on its side.
2. When it’s going fast, gently put your fingers on it to stop it. Move your hand off immediately when it stops.
3. Now spin the raw egg.
4. Stop it in the same way you did with the hard-boiled egg. After you let go, what happens?
What Happened:
Newton’s First Law of Motion, also known as the Law of Inertia, states that an object’s velocity will not change unless it is acted on by an outside force. This means an object at rest will stay at rest until a force causes it to move. Likewise, an object in motion will stay in motion until a force acts on it and causes its velocity to change.
The raw egg should have started to turn again. This is because the motion of the liquid within the egg is still going; the force you exerted was not enough to stop both the inertia of the shell and the inertia of the liquid inside of it. If you held the egg longer, you would exert enough force to stop the egg completely. These results demonstrate the Law of Inertia: an object will continue to remain in one state until sufficient outside force acts upon it, either to put it in motion or to bring it to rest.
Green Eggs
Have you ever read the Dr. Seuss book Green Eggs & Ham? Here’s a little pH trick to make some green eggs just like in the book. (Have an adult help you!)
What You Need:
- Frying pan and stove
- Egg
- Red cabbage (it’s called red, but it looks purple!)
What you Do:
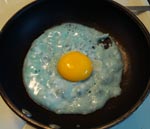
1. Chop a 1/2 cup of cabbage, cover it with boiling water, and let it sit for 10 minutes until the water is dark purple. Strain out the cabbage.
2. Crack an egg and separate the egg white from the yolk by carefully pouring the egg from one half of the shell to the other over a bowl. (Or you can pour the egg into a slotted spoon over a bowl instead.) Set the yolk aside.
3. Mix a little cabbage juice in with the egg white. What happens?
4. Grease the pan and let it heat up a little, then pour the egg white in.
5. Set the yolk in the middle of the egg white and finish cooking!
What Happened:
Red cabbage contains pigments called anthocyanins, which change colors when they come in contact with acids (low pH) or bases (high pH), making them a natural pH indicator. When the cabbage juice comes in contact with an acid (like vinegar) it will turn red, but when it is mixed with a base it will turn bluish-green. What does this project tell us about egg whites, then? Egg whites are basic (also called alkaline) and so they turn the red cabbage juice green.
All About Feathers
 When baby chicks hatch, they are covered with tiny, soft, fluffy feathers called down. Down helps keep them warm. (It can keep us warm too, which is why quilts and coats are often stuffed with down!) As they grow older, chicks grow bigger feathers called contour feathers. These are colored on the tips and downy at the base (the part closest to the body) to help keep them warm. They also grow long, strong flight feathers on their wings and tail. Look at a feather up close to learn more about it:
What You Need:
- A large feather (you can try to find one outside, or buy one from a craft store. Feathers you find outside can be very dirty, so make sure you wash your hands when you’re done with this project!)
- Magnifying glass
- Velcro
- Water
What You Do:
1. Feathers help protect birds from getting drenched in the rain. Instead of soaking through them, water just slides right off! Turn on the water faucet so it is just a tiny trickle. Hold a paper towel underneath the faucet and watch how the water soaks right through. Next, put the feather under the trickle. What happens? The water should just roll off, leaving the feather dry. (If it doesn’t, try turning the feather over.) Birds keep their feathers waterproof by putting a layer of oil on them. They get the oil from a place near their tail called a preen gland.
2. Look at a piece of velcro. Do you see how one side has tiny hooks that catch on to the other side? Bird feathers work a little bit like this. Take your feather between two fingers and rub your fingers down from the tip. The long, thin ‘branches’ of the feather (called barbs) will separate into sections. Use a magnifying glass to look at the barbs: they are covered with tiny little hairs called barbules. Now take your fingers and smooth the barbs back together. The barbules catch each other and stick, like velcro. Sometimes you will see a bird rubbing its feathers with its beak. This is called preening and the bird does it to smooth the barbs back together.
3. What’s that running down the middle of your feather? That’s the rachis (say RAY-kuhs), and it makes the feather strong. Look at the very end, which is called the quill – does it look a little bit like a drinking straw? That’s because it’s hollow, to keep the feather from getting too heavy. People used to dip the quill in ink to use as a pen!
Easter Egg Science Lesson

The shell of an egg is made of calcium carbonate. Calcium carbonate is also what’s in sidewalk chalk! The eggshell is what protects the egg, housing the yolk and white. If you were to remove the shell, just below would be a thin layer called the membrane. The membrane is like a layer of skin that also helps protect the egg.To dissolve the eggshell you use vinegar. Vinegar is also what you used to make your dye work better.
Did you know that vinegar and oil don’t mix? If you have a bottle of salad dressing that contains oil and vinegar it needs to be shaken before using it. The oil and vinegar will appear to be mixed well after you shake the bottle, but then a moment later they will start to separate. This is because the two liquids have different chemical structures. They way they are made is different. Oil is sticky and slimy. Oil doesn’t mix with water. Vinegar does mix with water. The only way that vinegar and oil can come together is by adding another item such as mayonnaise, or an egg. Eggs are used in cooking and baking a lot because they help bind different things together. For example, oil and vinegar! Eggs are used in pancakes, bread, cake, and cookies to give them good texture and make them fluffy. Egg whites especially are used in the kitchen to make light and fluffy treats like meringue.
Are the eggs you dyed safe to eat? If you kept them refrigerated, then yes, they definitely are! Hard-boiling eggs is an easy way to cook them to make sure they are done enough so that they are safe to eat. You can chop hard-boiled eggs and add them to a green salad, or make egg salad sandwiches. Since the dyes are natural, there will be less color that seeps through the shell into the white of the hard-boiled egg than if you used store-bought dyes.