Have you ever flown a kite? In this issue we’ll show you how to build your own simple kite and fly it! You’ll also learn about the science that allows things to fly (called physics), the four main forces of flight, what kites and airplanes have in common, and demonstrate Bernoulli’s Principle.

How to Make a Kite
Use these instructions to build a simple sled kite. Check out the ideas at the end of the project to experiment with how a longer tail or a lighter-weight paper can change the way a kite flies.
What You Need:
- large paper bag
- 2 12′ long wooden skewers
- clear tape (packing tape is best)
- glue stick
- scissors
- pencil
- ruler
- hole punch
- markers or crayons
- strips of crepe paper, plastic, fabric, or ribbon
- a roll of kite string
- an adult to help (important – please do not attempt this project without help)
What You Do:
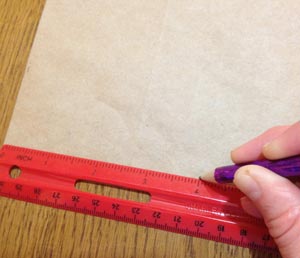
1. Use your ruler to connect the marks, making a vertical line down one side of the rectangle.

2. Repeat steps 4 & 5 to make a line 4′ from the right edge, too. You should now have three sections: the left section is 4′, the middle section is 8′, and the right section is 4′.
3. Measure 4′ down from the top left corner and mark it (along the 12′ edge).
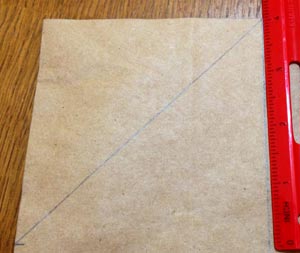
4. Use your ruler to draw a diagonal line from that mark to the top of the vertical line you made in step 5. Then turn the ruler towards the bottom and make another diagonal line connecting the line you just drew to the bottom of the vertical line.
5. Repeat step 7 from the top right corner, 4′ down. Then, repeat step 8 on the right side.
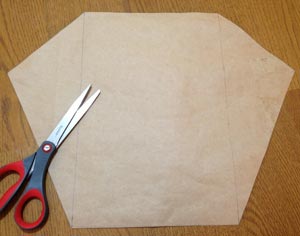
6. Carefully cut the corners of the rectangle off along the diagonal lines.
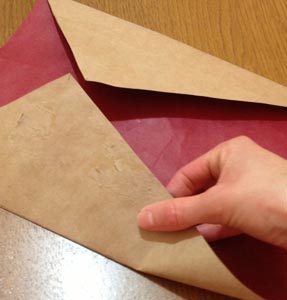
7. Turn the kite over and fold the pointed corners in and crease along the pencil lines on each side. Flip it back over and reverse the creases.
8. If you would like to decorate your kite, do so before going on to the next step. Avoid things that will add weight to your kite such as jewels, glitter, or paint.
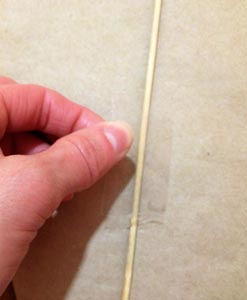
9. Use small strips of packing tape to attach one wooden skewer along the fold line of each flap. (Note: if your skewers are not the correct size, you can cut them with sharp scissors by holding the place that needs to be cut between the scissor blades and twisting the skewer around while putting pressure on the scissor handles. You can tape pieces together if your skewers are too short.)
10. Reinforce the pointed corners of the kite with two pieces of tape, folding the tape over the edge of the paper to overlap the corner.
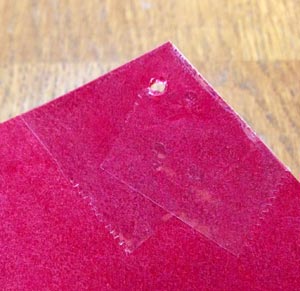
11. Using a hole punch, make a hole through the layers of tape and the paper in each of the two corners. Make sure the hole isn’t too close to the edge – it should be about 1/4′ in.
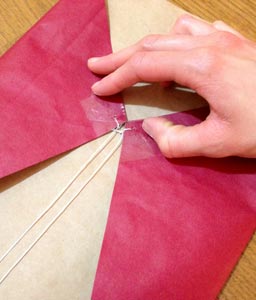
12. Cut a 5′ length of kite string and attach one end of the string securely to each hole. Hold the flaps down so they are touching in the middle of the kite, then tie a loop in the center of the string. (It is important to make sure you get the loop exactly in the center so your kite will be balanced.) This is called the bridle.
13. Tie the end of the roll of string to the bridle loop.
14. Cut two tails each at least 2′ long and glue them to the kite – one next to each folded flap. Reinforce with a strip of tape so the tails won’t fly off in a gust of wind. Once the glue has dried, your kite is ready to fly!
Up, Up & Away: Tips & Tricks
- Start with a windy day. The best way to get a kite flying is to have a steady wind. You don’t need strong wind, but you do need constant wind.
- Hold your kite in one hand and the spool of string in the other, then begin to run into the wind. When you feel the wind pushing against your kite, let it go, pushing it up into the air. As soon as the string becomes tight, slowly let out more and watch your kite rise higher in the air!
- Never fly a kite near power lines. Staying away from trees is a good idea, too.
- Once your kite is up and flying, there isn’t much you need to do. Just enjoy watching it and be prepared for it to make its way down if the wind changes or stops.
Once you master flying your kite, experiment with different tails and materials and their effects on the kite. Here are some ideas:
1. Fly the same kite with one, two, three, or even more tails, and compare the difference each time.
2. Use tails of different lengths.
3. Make tails from different materials such as strips of plastic, paper, or fabric.
4. Build a new kite using the pattern described above but with a different material: For example, use newspaper and plastic straws instead of a paper bag and wooden skewers.
5. Build a similar kite but make it larger.
6. Try building a different style of kite and compare how it flies with how the sled kite flies.
Science Lesson
Basics of Flight
There are four main forces involved in flight: lift, weight, thrust, and drag.
Picture an airplane as you read about how these forces work together during flight.
Lift is caused by differences in pressure when air flows over and under an airplane’s wings.
Lift is opposed by weight, or the force of gravity that is constantly pulling downward on the airplane.
Thrust is caused by the action of the plane’s propellers moving the plane forward.
Opposed to thrust is drag, which comes from air resistance. If lift is greater than weight, the plane will rise. If thrust is greater than drag, the plane will accelerate (speed up). The interaction between those four forces is how an airplane can move up and forward.
Airplanes are designed with these forces in mind. Wings need to use lift to their advantage – by being shaped so that air has to travel farther over the top of them than under them. This is explained by what is known as Bernoulli’s Principle, which states that an increase in the velocity (speed) of air (or any fluid) results in a decrease in pressure. When air has to travel farther over the wings, it will automatically go faster, which results in a lower pressure above the airplane’s wings. The air traveling a shorter distance under the wings creates a higher pressure. The higher pressure under the wing pushes the airplane up through the air above the wing, which has a lower pressure. Once an aircraft has lift, it needs thrust to move forward. This is provided by the engine and propellers.
You can demonstrate Bernoulli’s Principle with this simple exercise. Cut a strip of paper about 1.5′ wide. Holding a short end of the paper strip near your lips and blow slowly and evenly over the paper. The end of the strip will rise up. This is because the air you blew out over the top of the paper was moving quickly, so its pressure was lower than the still air around the paper. The still air with the higher pressure pushed the paper upwards into the lower pressure air from your breath.
A kite flies in the same way as an airplane, but it needs wind to help it move more than a plane does. Instead of an engine, the tension from someone pulling on a kite’s string and some help from wind is what provides thrust for a kite. For a kite to remain flying, the amount of lift needs to be equal to the amount of weight so that those forces balance each other. Likewise, thrust and drag must be equal to each other.
What About Wind?
Wind is air moving through the atmosphere (layers of air surrounding the whole earth). When Earth is heated by the sun, it does not heat up evenly all over because of the differences caused by land and water. This means that there are constantly different temperatures of air moving around in the atmosphere. Warm air has a different pressure than cool air. Warm air rises and cool air sinks. When the different temperatures of air interact, wind is created! Wind is measured by its speed and its direction. We measure wind speed in knots, or miles per hour (or kilometers per hour). We measure wind direction according to the direction it is coming from, not the direction it is blowing (example: a west wind is one that came from the west, not one that is blowing towards the west).
There are various wind patterns across the entire earth that play a large part in what the weather is like in different places around the world during different seasons. Of course, wind isn’t always predictable and can change quickly, but wind patterns help weather reporters make more accurate predictions.
Wind also helps other things fly. Birds, insects, and even seeds from plants are easily carried by the wind. Birds can soar on the air (just like a kite) in the right wind. Even non-flying insects, such as baby spiders suspended in the air from silk threads, can catch a ride on the wind to get from one place to another. Breezes help carry seeds and pollen from plants, such as dandelions, to new locations.
Besides being able to keep a kite flying high, wind can also be used as a source of electricity. It is a good option because it doesn’t produce harmful toxins or chemicals and there is an unlimited supply of it – there is always wind somewhere! Windmills (or turbines) are used to collect energy from wind. The blades of the windmill turn when the wind blows them which in turn makes a generator inside the windmill run, which produces electricity.